Exploratorium: Lab Notebooks
1 Overview
You will spend time exploring some of the lab equipment you will be using this semester and learn how to create a OneNote lab notebook.
2 Learning Goals
After completing this lab, you should be able to:
- Use OneNote on your tablet computer as a digital lab notebook
- Embed an Excel spreadsheet into your OneNote notebook
- Turn in your lab notebook to Canvas at the end of the lab for credit
- Recognize some of the lab equipment to be used in PHYS 1140
3 Pod Introductions
The lab room is organized into “pods,” where a pod is a grouping of four tables (8 students). Throughout this semester, you will often discuss ideas and results with other students in your pod, similar to project teams in the workplace. Start off this lab session by having everyone in your pods introduce themselves to the other members of that pod.
4 Before You Begin: Set Up Your Lab Notebook
Before starting the activities below, you need to set up your OneNote lab notebook and connect it to OneDrive so your work saves automatically.
Follow the step-by-step instructions in the OneNote Setup. Your TA will walk the room to help during this process.
Your notebook should be syncing to OneDrive and you should have read through the “Start here” and “Notebook guidelines” sections. When your TA directs you to your first activity, continue below.
5 Notebook Callouts
Throughout this and every other lab guide in the course, gold-highlighted boxes like the one below identify the key items to record in your lab notebook for that section.
This is a notebook callout. When you see one, record the items it describes in your OneNote notebook.
You are always encouraged to document additional observations and reasoning beyond what is highlighted. Label each section in your notebook with the corresponding section number from the lab guide so you have context if you ever need to refer back to your work.
6 Multicolor LED
This activity is about using the pen to write directly on the tablet. The apparatus uses a multicolored LED, where a single package contains three LEDs of different colors. Play around with the apparatus to explore how it works.
Use the stylus to handwrite in your OneNote notebook what the three knobs do. Give as much detail as possible.
7 Tennis Ball Launcher 1D
This activity is about recording data in Excel within OneNote. The apparatus uses a rubber band to launch a tennis ball at an adjustable angle relative to the floor.
Set the launcher to aim straight up, 90° from the floor. Pull back the handle on your launcher to the first “click,” and then load your tennis ball by pushing it in until you feel it reach the back of the chamber (you will feel some resistance).
Never put any part of your body, especially your face, above the launcher in the line of fire.
Practice loading and firing the launcher a few times. Make sure everyone in your group gets a chance to try it out.
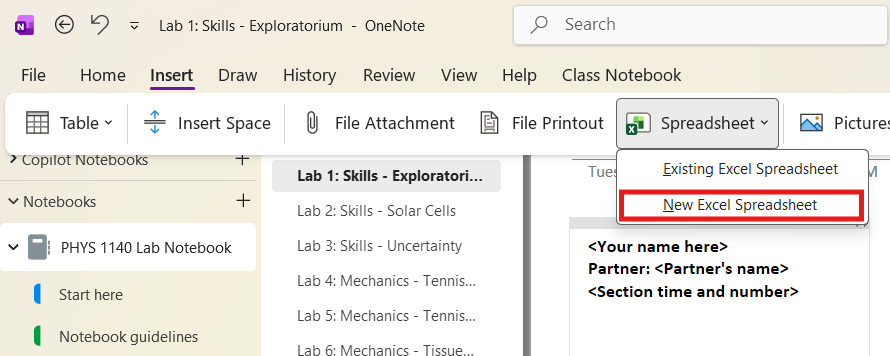
Start by embedding an Excel spreadsheet in your OneNote notebook:
- On the OneNote ribbon, click Insert > Spreadsheet > New Excel Spreadsheet (Figure 1).
- A spreadsheet appears embedded in your page. Hover over it and click the Edit button in the top-left corner to open it in Excel.
Measure the maximum height of a vertical launch several times. Record the data as a table in your embedded Excel spreadsheet. Make sure the table has headings/labels with units, so you know what data is recorded.
Now use the power of Excel to do a calculation on each data point recorded. Click an empty cell in a new column and type a formula beginning with =. Your formula can reference other cells — for example, =(1/2)*(0.2)*B2^2 multiplies constants by the value in cell B2.

Press Enter and the cell displays the result. To apply the same formula to every row, click the cell with the computed result, grab the small square at the bottom-right corner, and drag it down the column. Excel automatically updates the cell references (B2 becomes B3, B4, etc.).
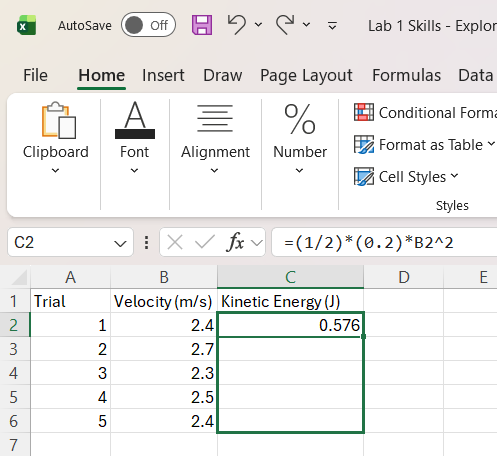
Using a formula in Excel, calculate the potential energy of the ball when it is at its maximum height for each measurement, \(U = mgh_{\max}\). Assume \(U = 0\) at the base of the meter stick and the mass of the ball is 57 g. Use the drag-to-fill method to apply your formula to every row.
When you are done entering data, save and close the Excel program to return to OneNote. You should see the data you entered displayed in the embedded spreadsheet within OneNote. Your spreadsheet is still embedded in your notebook, and you can click the edit button to reopen it in Excel and make changes at any time.
8 Solar Cell Powered Motor
This activity is about making a note in your OneNote lab notebook. The apparatus uses a bright LED light to activate a solar cell, which powers a motor attached to a spinning disk.
Turn on the power supply and turn the voltage and current knobs up until the disk starts spinning. Most components are held in place by magnets — you can remove them to explore how the device works.
Please keep current below ~0.8 A.
Click anywhere in the page and start typing to insert a note. Don’t worry about whether your answers are “correct” at this point. We’ll be learning more about this apparatus next week!
Experiment with the setup and write a few sentences answering the following questions:
- What is the purpose of the white light?
- What is the purpose of the red light?
9 Laser Light Refraction
This activity is about using the pen to make some sketches. The apparatus uses a laser to see how light bends as it enters and leaves a semi-circular container of liquid.
Center the semi-circular disk (filled with water) on the rotating table and turn on the laser.
Do not let the laser shine into your eye, or anyone else’s eye.
Observe the path of the laser light. Rotate the stage that the disk is resting on and observe how the laser’s path changes.
Practice using the pen that is attached to your tablet computer to write something in your notebook. It is easiest to write on the tablet if you first completely remove the magnetically attached keyboard, which you can do by simply pulling it off.
Make two sketches: one that shows what happens when the flat side of the disk is facing the laser, and another that shows what happens when the curved side of the disk is facing the laser. Include labels to make the sketches easier to understand. Add captions describing, in one or two sentences, what the sketches show.
10 Tennis Ball Launcher 2D
This activity is about making a labeled diagram or picture. The apparatus uses a rubber band to launch a tennis ball at an adjustable angle relative to the floor.
Set the launcher to aim at any angle between 0° and 90° from the floor. Pull back the handle on your launcher to the first “click,” and then load your tennis ball by pushing it in until you feel it reach the back of the chamber (you will feel some resistance).
Never put any part of your body, especially your face, above the launcher in the line of fire.
Practice loading and firing the launcher a few times. Make sure everyone in your group gets a chance to try it out.
Feel free to use the pen that is attached to your tablet, to copy and paste a photo from the “Camera” app on the tablet computer, or to take a picture with your phone and transfer it into OneNote via email or other method. Don’t be afraid to get a bit creative!
Create a diagram of the launcher and the ball’s trajectory. Label various components to make the diagram easier to understand. Add a caption describing, in one or two sentences, what the diagram shows.
11 Parallel Plate Capacitor
This activity is about entering data into Excel. The apparatus uses two sheets of metal and some paper to form a parallel plate capacitor.
Place a sheet of paper between the metal plates. You just built a capacitor! The capacitance of a capacitor measures how much electric charge it will hold on its plates (positive charge on one plate, negative on the other) when connected to a battery. Capacitance is measured in units called Farads, abbreviated \(F\).
To measure capacitance, you will use a digital multimeter (DMM). Connect one wire from the DMM to the top plate, and the other wire to the bottom plate (it doesn’t matter which wire is which). Set the DMM to measure capacitance.
Embed a new Excel spreadsheet in your notebook (Insert > Spreadsheet > New Excel Spreadsheet, then hover over it and click Edit).
Measure the capacitance of the capacitor with 1, 2, and 3 sheets of paper between the plates. Record your measurements as a table in Excel. Make sure the table has headings/labels with units, so you know what data is recorded.
12 Turning In Your Notebook
Follow the instructions on the “Turning in Your Notebook” page in the “Start Here” section of your OneNote notebook. The steps are:
- In OneNote, navigate to the page for this lab activity.
- Click
File>Export>Page>PDF. ClickExportand save the file to the Desktop. - Open the PHYS 1140 Lab App and click
PDF CleanerunderTools. - Drop your exported PDF into the cleaner or click
Select PDFto find it. The cleaner removes extra margins, footers, and blank pages. - Click
Save Cleaned PDF. The cleaned file opens automatically — verify it looks correct before continuing. - Open a web browser (Chrome and Firefox are installed), navigate to Canvas, and upload the cleaned PDF under the corresponding assignment.
Do this each week before leaving the lab. Talk with your TA if you have any questions.
Also, make sure you sign out of the tablet computer before you return it to the cart each week. To do that, double-click the “LogOut” icon on the Desktop.